WordPress is undoubtedly the best free content management system now powering about 60% of the websites in the world. Using WordPress as a CMS comes with some limitations especially when you are building a brand-focused website. By default, the WordPress login screen and the dashboard come with the default WordPress logo. Creating a custom login page becomes inevitable if you are using WordPress as a CMS.
There are free plugins available in the WordPress repository that you can use to customize the WordPress login screen but they also come with their own limitations. In this tutorial, I will show you how to create a branded custom login screen for your WordPress site.
Developing a custom login for your website allows you to visually integrate your website design concepts and the brand logo. This is not only visually appealing but also helps your customers or users identify with your brand.
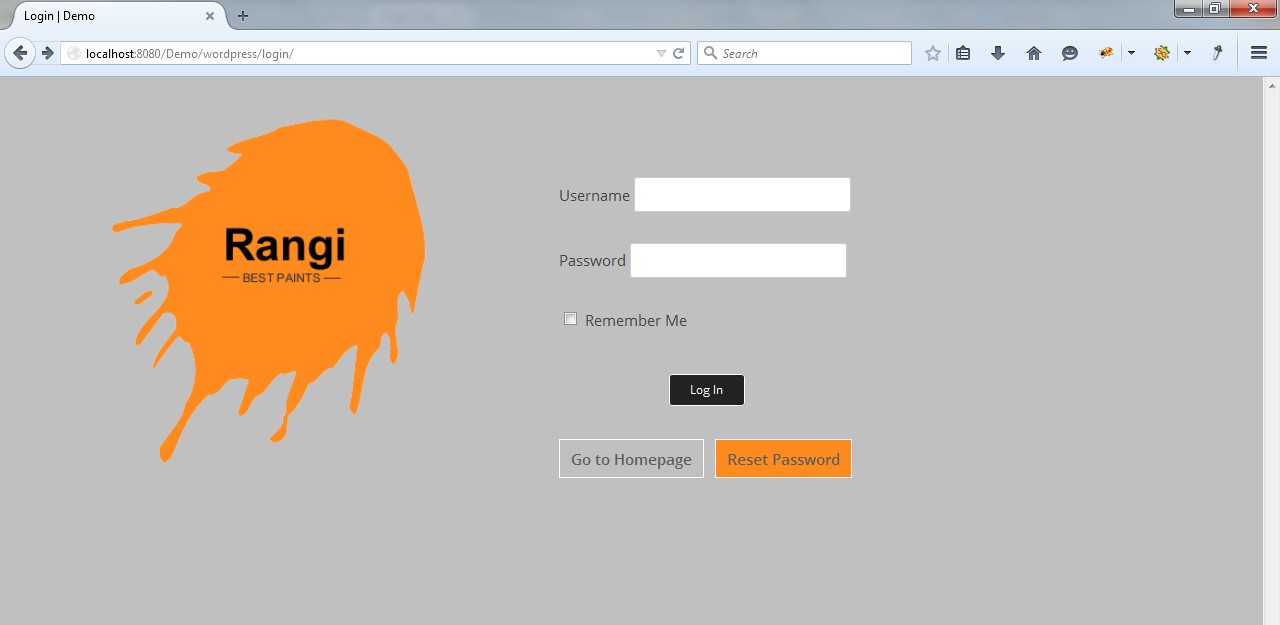
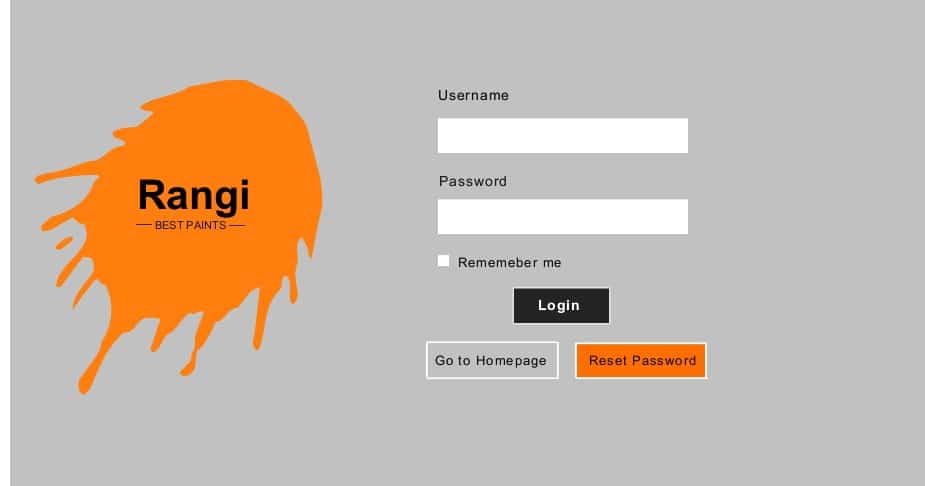
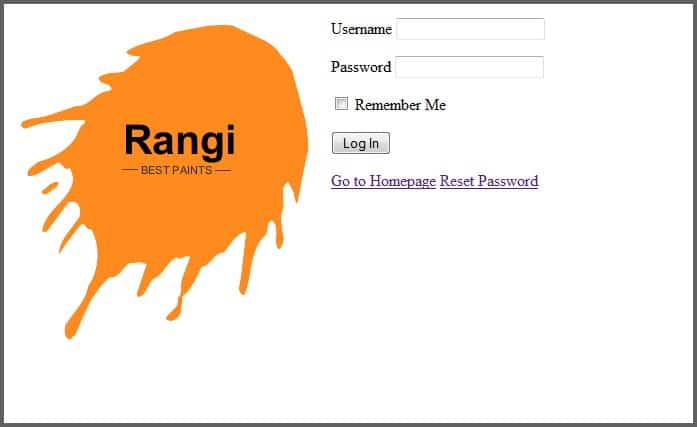
Here is the final custom login page from this tutorial:
Development of Custom Login Page
To create a custom login in WordPress, you can either create a plugin or create a page template in your theme. For the purpose of this tutorial, I will focus on the latter.
Creating a custom login page for your theme allows you to ship the theme with the feature, something that might be useful for premium themes developers. You can also add this custom page to an existing WordPress theme.
Designing the Page
The first step is designing the custom login page to incorporate the brand identity and your custom website design impression. For this tutorial, we will be building a custom login page for a fictitious paint company called ‘Rangi’. The basic design of the custom login page looks like the screenshot below:
Coding the Page
For us to create this login page we will require a custom page template on which we will later add the WordPress login form. We will further test for login errors and implement redirects and restrictions to the users who log in.
We can allow users to access certain pages and restrict their access to the WordPress dashboard. This is an important feature for a membership site or a customer relationship management website.
- Creating Page Template
We begin by creating a page template for the login page. In your theme create a new page template using the code below:
<?php

/*

* Template Name: Login Page

*/
get_header(); ?>
<?php get_footer(); ?>
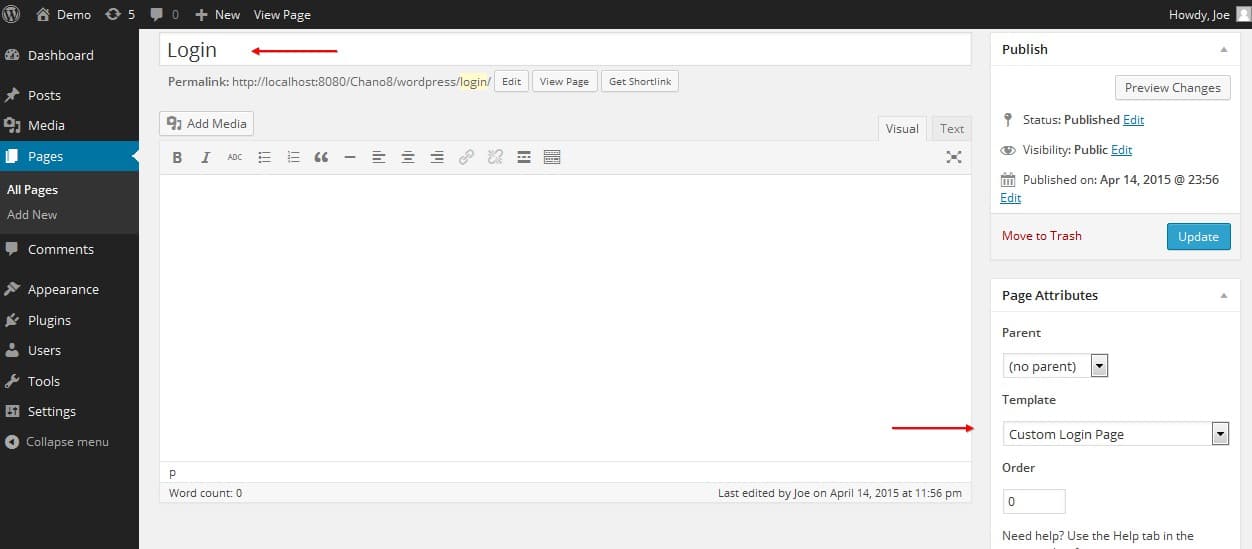
The next step is to publish the login page from the WordPress dashboard and assign this page to the template we created above.
This page is just like any other WordPress page in our theme since it has the header and the footer. To turn it to a login page we need to add a WordPress login form and customize it to our preference.
- Custom Header for Login Page
Before we add the WordPress login form to this page, you can choose to remove the header and footer or create a custom header and footer for the login page.
Custom Header for Login Page
If you need to create a custom header for the login page, you may remove some features like the menu or style it differently.
Copy the original theme header.php file and remove the features you don’t want on the login page header and save it in your theme folder as login-header.php.
After saving this file we should now edit the get_header() function to specify the login header. In this case we can add the custom header we just created as follows:
<?php

/*

* Template Name: Login Template

*/
get_header(login); ?>
<?php get_footer(); ?>
We can also create a custom footer and replace your default theme footer. In this tutorial I have will not have the footer on the login page.
WordPress Login Form Function
We have created the login page template now we need to create the login form and style it to match the branding needs.
Fortunately, creating the WordPress login page is not difficult since there is a WordPress function for creating this form and we can pass parameters in the array to manipulate the form. Here is the array we will use to create the login form.
<?php

$args = array(

'echo'           => true,

'redirect'       => site_url( $_SERVER['REQUEST_URI'] ),

'form_id'       => 'loginform',

'label_username' => __( 'Username' ),

'label_password' => __( 'Password' ),

'label_remember' => __( 'Remember Me' ),

'label_log_in'   => __( 'Log In' ),

'id_username'   => 'user_login',

'id_password'   => 'user_pass',

'id_remember'   => 'rememberme',

'id_submit'     => 'wp-submit',

'remember'       => true,

'value_username' => NULL,

'value_remember' => false

);

?>
Ref: https://codex.wordpress.org/Function_Reference/wp_login_form
We now should add this form to our login page template. Before we add this form to the template page we need to create the HTML structure for the page. We create the HTML structure based on the login page design. Here is the HTML markup for the page;
<div class="login-wrapper">

<div class="login-branding">

<div class="login-logo"></div>

</div>

<div class="login-form">

<div class="bottom-links">

<div class ="home-link"></div>

<div class ="reset-link"></div>

</div>

</div>

</div>
We should now add the login form and the logo then view the page to see the progress. We begin by adding the logo image uploaded in the images folder.
<img src="<?php echo get_bloginfo('template_url') ?>/images/Rangi Logo.png"/>
After adding the logo image we now add the login form, the homepage link and the reset button, here is the complete code;
<div class="login-wrapper">

<div class="login-branding">

<div class="login-logo"><img src="<?php echo get_bloginfo('template_url') ?>/images/Rangi Logo.png"/>

</div>

</div>

<div class="login-form">

<?php $args = array(

'echo'           => true,

'redirect'       => site_url( $_SERVER['REQUEST_URI'] ),

'form_id'       => 'loginform',

'label_username' => __( 'Username' ),

'label_password' => __( 'Password' ),

'label_remember' => __( 'Remember Me' ),

'label_log_in'   => __( 'Log In' ),

'id_username'   => 'user_login',

'id_password'   => 'user_pass',

'id_remember'   => 'rememberme',

'id_submit'     => 'wp-submit',

'remember'       => true,

'value_username' => NULL,

'value_remember' => false

); ?>
<?php wp_login_form( $args ); ?>
<div class="bottom-links">
<div class ="home-link"> <a href="<?php echo home_url(); ?> "> Go to Homepage</a></div>
<div class ="reset-link"> <a href="<?php echo wp_lostpassword_url(); ?> "> Reset Password</a></div>
</div>
</div>
</div>
The result for this part is as shown in the screenshot below:
Styling the Login Page
We now style the page to improve the appearance to fit our website design. The following is the CSS code to style the login page;
body {

background: none repeat scroll 0 0 #c0c0c0;

}

.login-wrapper {

margin: 0 auto;

max-width: 760px;

}

.login-logo {

float: left;

padding-right: 50px;

}

.login-username {

min-height: 60px;

}

.login-submit {

min-height: 60px;

}

.login-password {

min-height: 60px;

}

.login-remember {

min-height: 60px;

}

.login-form {

float: right;

margin-left: 20px;

max-width: 600px;

padding-bottom: 10px;

padding-left: 10px;

padding-top: 10px;

}

.home-link {

border: 1px solid #fff;

float: left;

padding: 10px;

}

.reset-link {

border: 1px solid #fff;

float: left;

padding: 10px;

margin-left :10px;

background :#FF8B1F;

}
It is important to note that while styling your login page you can choose to override some theme styles using dynamic CSS or you can style the login page to match your theme CSS styles.
You should also remember to enqueue the stylesheet in your custom header if you use a separate custom stylesheet.
The final product should look like the screenshot below:
We have created the login template page, added the login form, and styled it. We should now log in successfully but we need to further add functions to enhance our login process and make it smooth for users.
Login Redirection, Restrictions, and Error Management
Finally, we need to address a few issues before we can complete our custom login page. We need to create a custom page for a password reset, we need to have a member’s area where we can redirect members to when they log in and finally we need to devise ways of handling errors resulting from unsuccessful login attempts. We also need to notify the user when the login attempt fails.
1. Redirection
- Redirecting Users to Member’s Area or Page
When the users log in they should be redirected to the member's area instead of the default WordPress dashboard. To achieve this we need to edit the template page to redirect users to the members’ area.
We should change this default redirect array key to redirect the users to the member's area when the login is successful.
<?php

$args = array(

'redirect' => site_url( $_SERVER['REQUEST_URI'] )

);

wp_login_form( $args );

?>
We should change it as shown in the code below :
<?php
/*
Redirect users to member’s area when they login
*/
$args = array('redirect' => get_permalink( get_page( $page_id_of_member_area ) ) );
wp_login_form( $args );
?>
Here we are using the get permalink () and get page () functions to redirect the user to the member’s area.
- Redirecting wp-login.php URL to Custom Login Page
We also need to make the wp-login URL inaccessible and instead, the users are redirected to the custom page we created. We edit the function.php file by adding the following code;
<?php

/*

Redirecting wp-login.php to our custom page

*/

function redirect_login_page() {

$login_page = home_url( '/login/' );

$page_viewed = basename($_SERVER['REQUEST_URI']);

if( $page_viewed == "wp-login.php" && $_SERVER['REQUEST_METHOD'] == 'GET') {

wp_redirect($login_page);

exit;

}

}

add_action('init','redirect_login_page');

?>
Note: For this to work the variable ($login_page) we have created in the code above should be substituted with the respective variable in your custom login page.
- Redirecting Users after Successful Logout
By default when users logout they will be redirected to the wp-login.php page. We need to redirect them to the custom login page after they have logged out. We further edit the functions.php by adding this code
<?php

/*

Redirecting logout to custom login page

*/
function logout_page() {
$login_page = home_url( '/login/' );
wp_redirect( $login_page . "?login=false" );
exit;
}
add_action('wp_logout','logout_page');
?>
2. Error Management
When dealing with forms, validation becomes necessary since we anticipate errors that can occur when logging. The two most errors we will deal with are:
- Empty username or password
- Incorrect username or password
When these errors occur we need to display error notification to the user as well as redirect the user to the custom login page since the default WordPress failed login attempt redirects to the WordPress dashboard.
We can achieve this by adding some code on the custom template page to test for different conditions and display the error message as well as redirect the user.
Failed Login Attempt
- Testing Failed Login Attempt
We should use the WordPress Action wp_login_failed to manage the failed login attempts when the password and the username are incorrect. To achieve this we should add this code to function.php file
/*

Failed Login Hook

*/
add_action( 'wp_login_failed', 'pu_login_failed' ); // Failed Login Hook
function pu_login_failed( $user ) {
// checking where the login attempt came from
$referrer = $_SERVER['HTTP_REFERER'];
// checking if we are on the default login page
if ( !empty($referrer) && !strstr($referrer,'wp-login') && !strstr($referrer,'wp-admin') && $user!=null ) {
// checking don't have a failed login attempt yet
if ( !strstr($referrer, '?login=failed' )) {
// redirecting to the custom login page and appending a querystring of login failed
wp_redirect( $referrer . '?login=failed');
} else {
wp_redirect( $referrer );
} exit; }
}
When the login fails we are checking the URL the login attempt came from and whether it is the default wp-login.php we then pass a query string parameter of failed login and a redirect.
- Checking if Username or Password is Empty
We now need to check if the username or the password is empty for us to notify the user with an error message on the custom login page. To check if the password or username is empty we add the following code to functions.php file
/*

Checking if username and Password is Empty

*/
add_action( 'authenticate', 'pu_blank_login');
function pu_blank_login( $user ){
// check what page the login attempt is coming from
$referrer = $_SERVER['HTTP_REFERER'];
$error = false;
if($_POST['log'] == '' || $_POST['pwd'] == '')
{ $error = true; }
// check that were not on the default login page
if ( !empty($referrer) && !strstr($referrer,'wp-login') && !strstr($referrer,'wp-admin') && $error ) {
// make sure we don't already have a failed login attempt
if ( !strstr($referrer, '?login=failed') ) {
// Redirect to the login page and append a querystring of login failed
wp_redirect( $referrer . '?login=failed' );
} else {
wp_redirect( $referrer );
} exit; }
}
Displaying the Error on the Login Page
We should now edit the custom login page template to display the error message when there is a failed login attempt. We add this code to the WordPress login form code:
$args = array( 'redirect' => site_url() );

if(isset($_GET['login']) && $_GET['login'] == 'failed')

{   ?>

<div id="login-error">

<p>Login failed, wrong Username or Password</p>

</div>
The complete WordPress login form code should look like this
<?php

$args = array(

'echo'           => true,

'redirect'       => get_permalink( get_page( $page_id_of_member_area ) ),

'form_id'       => 'loginform',

'label_username' => __( 'Username' ),

'label_password' => __( 'Password' ),

'label_remember' => __( 'Remember Me' ),

'label_log_in'   => __( 'Log In' ),

'id_username'   => 'user_login',

'id_password'   => 'user_pass',

'id_remember'   => 'rememberme',

'id_submit'     => 'wp-submit',

'remember'       => true,

'value_username' => NULL,

'value_remember' => false

);

$args = array( 'redirect' => site_url() );

if(isset($_GET['login']) && $_GET['login'] == 'failed')

{   ?>

<div id="login-error">

<p>Login failed, wrong Username or Password</p>

</div>

<?php   }   wp_login_form( $args ); ?>
Finally, we now style the error message by adding the following code to the CSS:
#login-error {

background: none repeat scroll 0 0 #ff0000;

border: 1px solid #ddd;

color: #fff;

font-weight: 600;

margin-bottom: 20px;

padding: 5px;

}
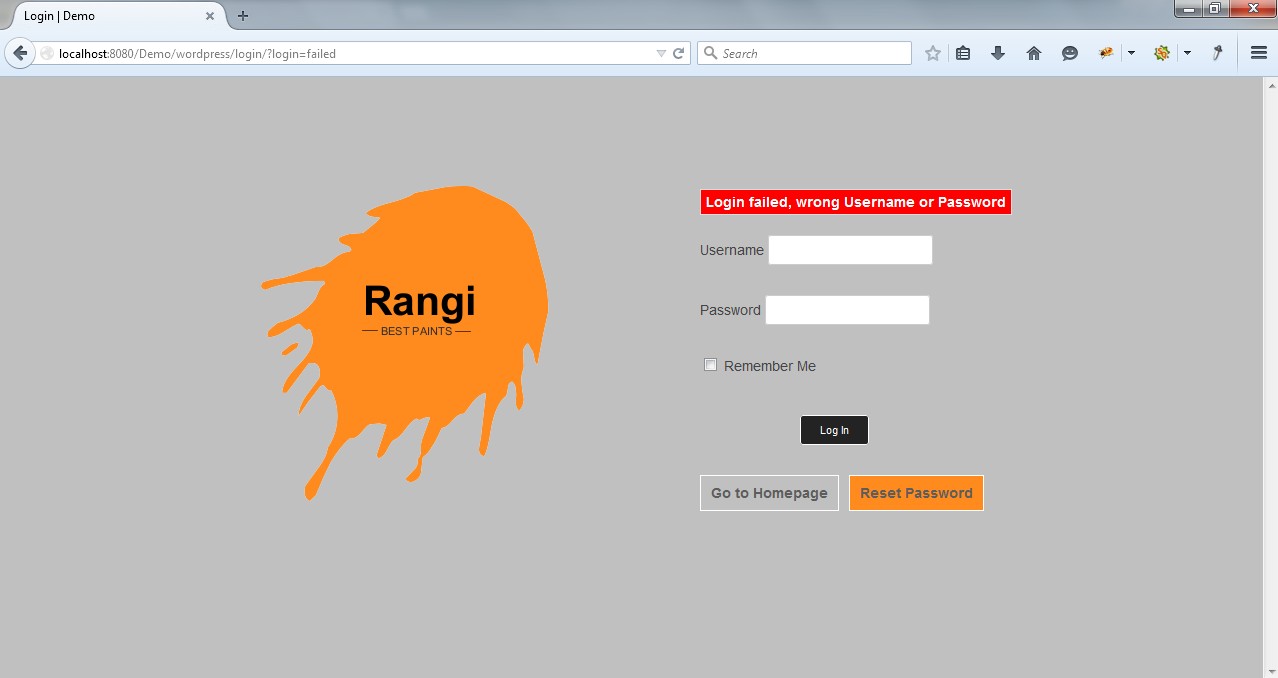
The error should be displayed as shown in the screenshot below:
3. Password Reset Custom Page
When you click the password reset button you will be redirected to the default password reset page. We need to further customize this password reset page to suit our brand identity.
I will cover this topic comprehensively in the next tutorial.
Conclusion
This is one of the many ways of customizing WordPress login page unlike using plugins this approach allows you to create your own design and implement your brand identity. I hope this tutorial helps you create your own custom WordPress login page.
For additional information, questions, feedback, and assistance feel free to get in touch in the comments section below.
References:
The following are useful references when creating the custom WordPress login page.
WordPress Codex:
Can you share a link to download this?