Introduction
Content Delivery Network CDN is known to be a great way of speeding up a website. By making use of this network, you can easily enhance your website’s speed which would, in turn, enhance its overall performance for the end-users as well as different kinds of search engine bots. In addition to this, it also brings highly positive effects on the ranking of your website in different search engines. This is due to the fact that websites incorporated with CDNs are known to deliver a fine experience to all their visitors on account of navigation and content.
Content Delivery Network is also known to parallelize different kinds of downloads all across your hostnames. In other words, when you put up a request to access a web page, several sub-requests would be generated for CSS, scripts, images, etc. In case everything including the CSS, scripts, and images is in a single domain, it takes much longer as all the requests are processed one by one which slows down the entire operation. On the other hand, when CDN is used, all the downloads across your hostnames are brought up to speed and the content access is provided to the client immediately. So if you are interested in configuring a content delivery network system of your own to deploy into a shared hosting word press blog, you need to go through the sections discussed below.
How to deploy a CDN into a shared hosting word press blog
There are different choices when it comes to the deployment of a CDN into different kinds of websites. You can use both free as well as paid services in this regard. If you are interested in a free or low-budget experience, the best course of action is to create a CDN of your own. It may easily be created along with your existing domain regarding the word press blog. All you need is to use the w3 total cache plugin and you are good to go.
Before you try to make an advancement with the whole CDN thing, it is highly recommended to take a complete backup of the whole My SQL database along with all your directory data. You need to keep in mind that taking a backup of all your data is critically important as you don't want to be left with no data in case something goes south.
So if you want to configure a CDN with a W3 total cache plugin to use with a shared hosting word press blog, you need to follow the steps given below.
Step 1:
First of all, you need to open up the FTP client associated with your blog and get into the domain’s FTP user account.

Step 2:
Get into the domain’s home directory. Look for the .htaccess file. Once it has been spotted, you need to make it writable. It may easily be done by granting the 777 permissions on a temporary basis.

Step 3:
Open up the file for wp-config. It is usually present in the home directory. Once you have managed to open it, type in the following code piece at the bottom of the file:
Define(‘ENABLE_CACHE’, true)
Step 4:
The code listed above grants permission for using the W3 total cache plugin. So this step requires you to get this cache for your site. It may easily be downloaded from word press.
Step 5:
Now you need to extract the zipped folder to get the contents of the W3 total cache plugin. Once you’re done, upload the entire folder to this path: /wp-content/plugins. Now get into the word press dashboard for your sit and activate this plugin.
Step 6:
Get into the cPanel provided by your web host and make a new subdomain while giving it this name: cdn.yourdomain.com. Once you are done, get into the domain FTP account. You will see two different domains here that are, a root domain and a subdomain.
Step 7:
Get to the root domain and download the entire wp-content folder to a local folder.
Step 8:
Open up the subdomain directory present in the FTP. Upload the entire wp-content directory there. All the work for the server as well as hosting is almost done. Not it is time to configure the W3 total cache plugin into the word press blog.
Step 9:
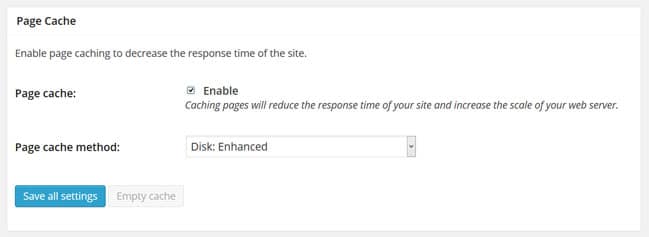
Go to the settings tab for your word press and choose the W3 total cache. Get into the general settings tab and activate the feature for page caching while selecting the disk enhancement method.


Step 10:
Hit ‘Minimize option’ and choose Disk Method. The disk method may only be chosen in case you are using shared hosting. Other methods might be used in case you have a VPS or dedicated hosting plan.
Step 11:
The content delivery network CDN must be selected as the self-hosted or FTP upload.
Step 12:
Under the settings for page cache, choose the method for compression as Gzip and deflate. This is supposed to reduce the overall page size and load it faster. You need to save your configuration and move on to the next steps.
Step 13:
Go to the CDN settings and choose your host active theme files. It is not recommended to use the wp-includes files in this case as it ends up generating errors sometimes.
Step 14:
Choose force overwriting of existing files. Save the changes and move on to the next steps.
Step 15:
At this stage, you would be able to see your FTP settings. You need to provide the settings for your web hosting FTP in the order of hostname, FTP username, FTP password.
Step 16:
Enter the following path:
/cdn.yourdomain.com
Step 17:
Save the changes and empty all your caches.

Step 18:
Try opening your website. You will be seeing a dramatic improvement in your website on account of speed and performance.

W3c Total Cache is simply the best WordPress cache plugin. Period.