If you have not heard of htaccess before, you are missing a great deal of knowledge on how to make your WordPress security better. This is a very important file that ‘lives’ in your WordPress installation folder and controls a lot of things happening on your site. In simple words, htaccess is the gatekeeper of your WordPress installation. As you will find out, you can lock intruders out of your site using WordPress htaccess and also control how search engines interact with your site. Let’s get started by understanding what the roles of htaccess are and how you can change the different settings on this file.
What is the .htaccess file?
This is a distributed configuration file that is located in your WordPress installation root and handles configuration changes in Apache (server) based on a particular site directory. WordPress utilizes .htaccess to manipulate how Apache (server) serves the files located in the site directory in which the .htaccess resides.
To locate your site’s .htaccess login to your site Cpanel or FTP and navigate to your site directory. Ensure you choose the option to see all the files including the hidden file to locate the .htaccess file. Some hosting environments may hide .htaccess; you need to enable the feature for hidden files in the directory settings:
Your site’s htaccess controls the Web Server (Apache) and is regarded as the most powerful configuration file since it has the capability to control access of the WWW's HyperText Transfer Protocol (HTTP) with a password, control 301 Redirects, and rewrites to just mention a few capabilities of htaccess.
WordPress uses this .htaccess file to manipulate the way that URLs of your site work both in the root directory and the subdirectory WordPress installation. As you will see in this tutorial, htaccess can solve a great deal of WordPress permalink problems. The basic WordPress .htaccess file contains the following rules: # BEGIN WordPress
<IfModule mod_rewrite.c>
RewriteEngine On
RewriteBase /
RewriteRule ^index\.php$ - [L]
RewriteCond %{REQUEST_FILENAME} !-f
RewriteCond %{REQUEST_FILENAME} !-d
RewriteRule . /index.php [L]
</IfModule>
# END WordPress
Locating Hidden .htaccess File
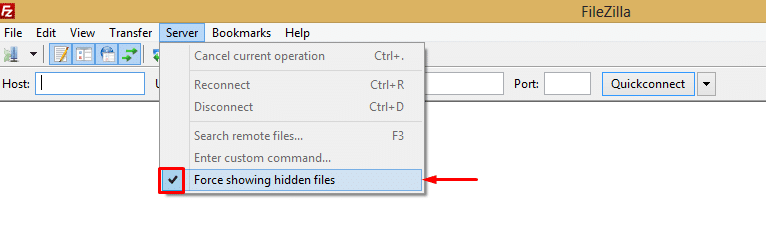
When editing .htaccess you will note that the name is written with a dot preceding the name. This simply means this is a hidden file and it may be difficult for some people to locate the .htaccess. You can use a simple FTP trick to force the .htaccess to visible. In Filezilla go to the server menu and click on the bottom option to force showing hidden files.
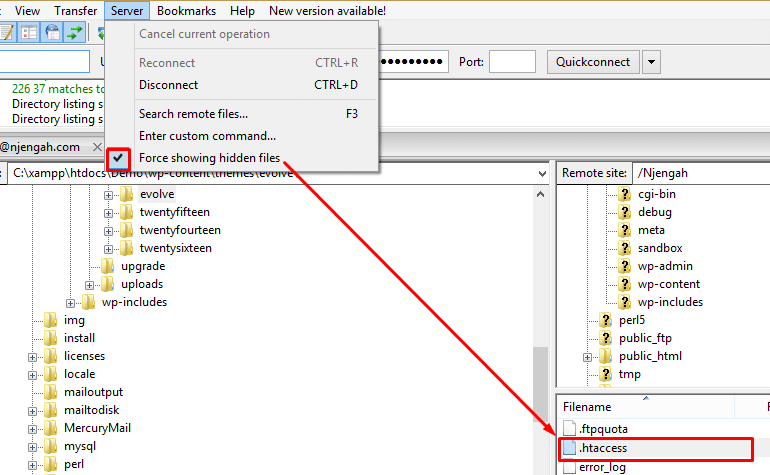
Login in now into your site and now navigate to the remote directory and you should now locate the htaccess that was hidden:
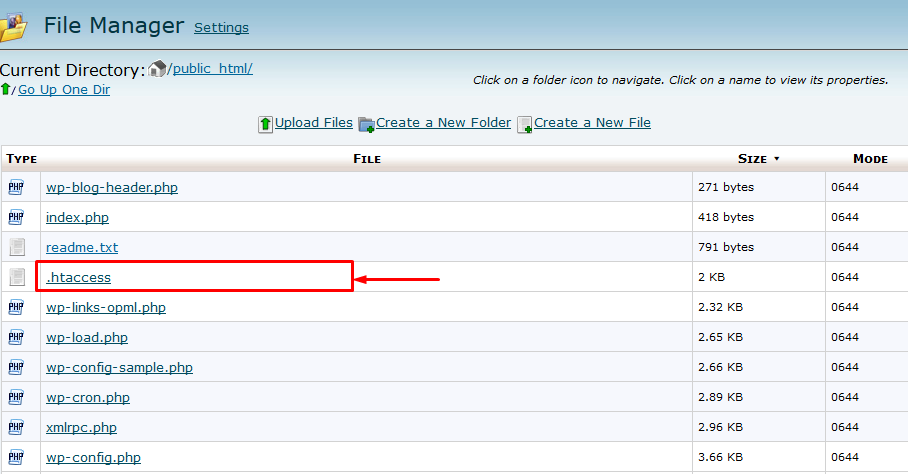
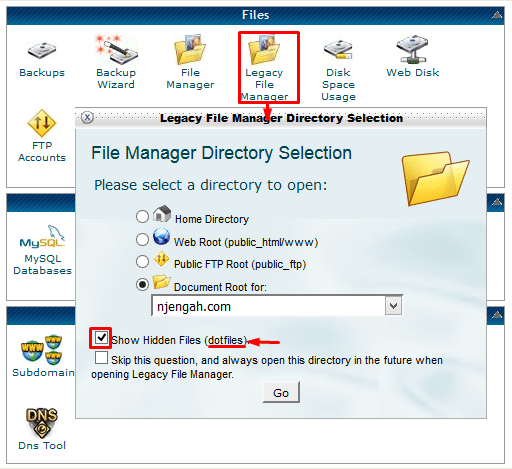
If you are accessing the site directory via the Cpanel, you should click on the Files icon then open browse to the site directory. Ensure you check the option to view hidden files:
On rare occasions like I encountered working on a client’s website, the .htaccess cannot be found since WordPress has not generated it since there was permission conflict in that server. In this case when you go to WordPress Dashboard > Settings > Permalinks, you will see the notice that your .htaccess is not writable and a suggested .htaccess that you need to add to your site directory.
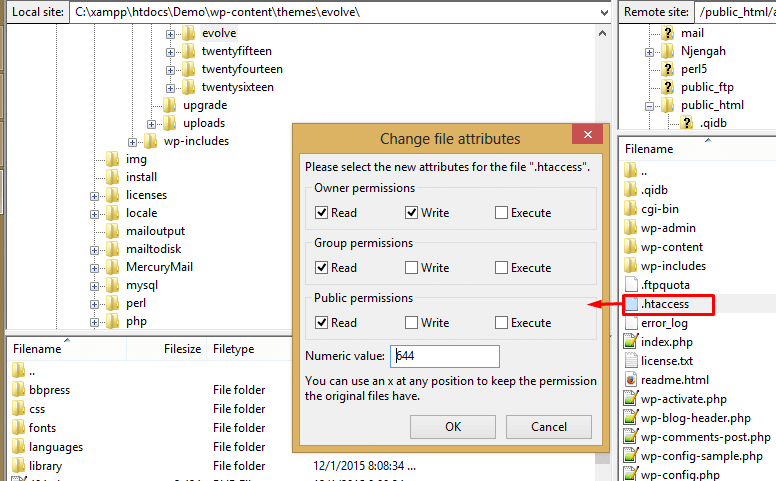
To solve this problem you will be required to save this code as .htaccess and upload it to your site directory via FTP. On some occasions, there might be a permission issue and you need to reset the permissions via FTP. It’s faster easier and effective. Just locate the .htaccess and right-click, you will see the option to change file permission. You should set it to 755 then save and upload the file.
To understand how these permissions work and why you need to change them, I would recommend you review changing file permissions.
Creating and Modifying WordPress .htaccess
When you have located WordPress .htaccess and opened it, you should place the rules outside the start and end comments of the htaccess. The start and the end are marked by the comments as shown below. # BEGIN WordPress
WORDPRESS DATA
# END WordPress
If you are updating this .htaccess file you should not add configuration directives between the two comments since it is likely to be overwritten by WordPress.
Creating .htaccess file for WordPress
To create a .htaccess file for WordPress you should open your text editor like notepad and add the rules of the .htaccess.
When you are done save the file as a normal text file like htaccess.txt then upload it to your site root directory and rename it to .htaccess.
Editing WordPress .htaccess via FTP and Cpanel
There are many ways to edit .htaccess in WordPress the most common being through the FTP. To edit .htaccess through FTP download the file and edit it, save it and upload it back.
Editing through the Cpanel requires you to log in and locate the file and edit it as a usual file. It is important to always back up the .htaccess before you can start editing.
Editing .htaccess using a Plugin
There are WordPress plugins available for editing .htaccess without having to log in to the Cpanel or FTP. One such plugin that is useful for editing .htaccess is WP Htaccess Editor. This plugin is my favorite since you can easily edit your .htaccess inside your WordPress dashboard. It also creates a backup for you to restore if the editing goes wrong.
15 Useful .htaccess Snippets for Security and Optimization
When you are editing .htaccess, you need to first backup this file since you need to restore it if you make any mistakes. The following are some .htaccess hacks you can implement in your site’s .htaccess:
1) Restricting Access to wp-config.php
This is the first step to keeping hackers completely out of your site. You can add them in your .htaccess: # Restrict access to wpconfig.php
<files wp-config.php>
order allow,deny
deny from all
</files>
2) Restricting Access to .htaccess file
To protect access of your WordPress .htaccess file by hackers you should add the following snippet in your .htaccess file: # Restrict access to htaccess
<files ~ "^.*\.([Hh][Tt][Aa])">
order allow,deny
deny from all
satisfy all
</files>
3) Stop hot-linkers in their tracks!
There are a number of people who burn your bandwidth by hotlinking on the images in your website. This can slow down your site especially when you are using running a large site. You can stop this by adding the following snippet to your .htaccess: #Stop hotlinkers in their tracks
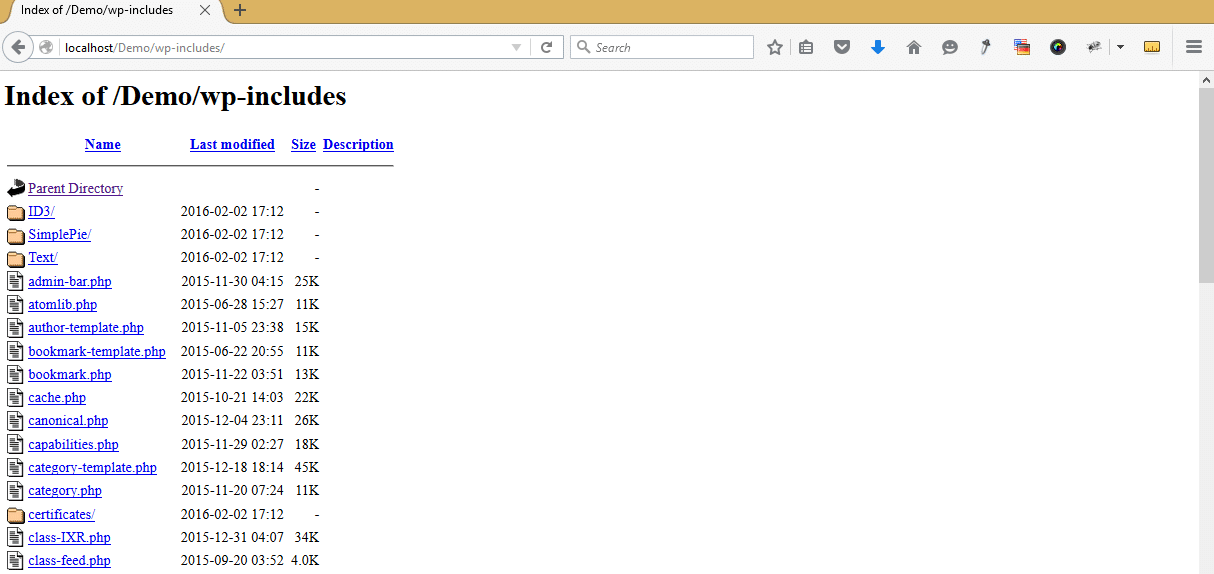
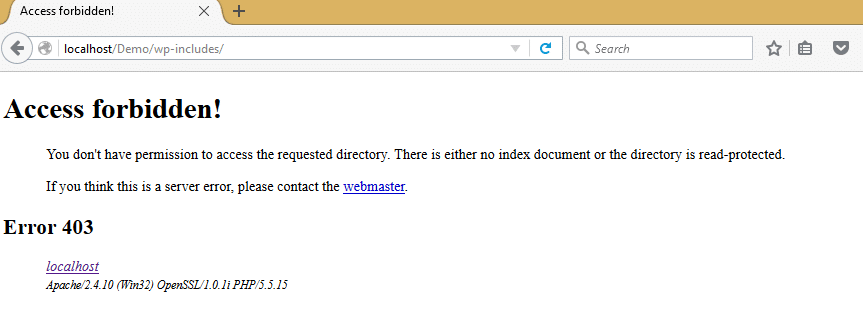
Most web servers like Apache allow directory browsing by default this can be dangerous since hackers can look for vulnerability in any of the WordPress files in the directory.
To stop directory browsing in WordPress just add the following line in your .htaccess: Options -Indexes
The result should be as seen in the image below:
5) Lock Access to WordPress Admin
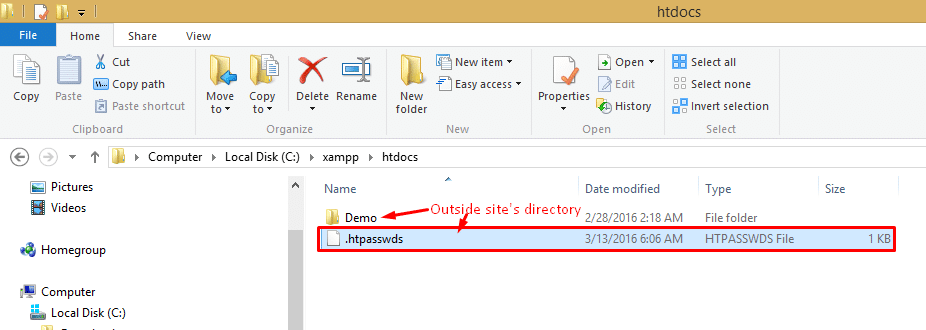
You can stop anyone from accessing WordPress admin by adding a snippet in your .htaccess and creating .htpasswds file. Generate the .htpasswds file from this generator. Save it as .htpasswds and place it in your site directory outside the public_html folder:
For this illustration, I am using the localhost. For a web server, you should place this file outside public_html. Then we should add the following code to the .htaccess file: AuthName "Joe Admin Only allowed to login"
AuthUserFile C:\xampp\htdocs\.htpasswd
AuthGroupFile /dev/null
AuthType basic
require user Njengah
<Files admin-ajax.php>
Order allow,deny
Allow from all
Satisfy any
</Files>
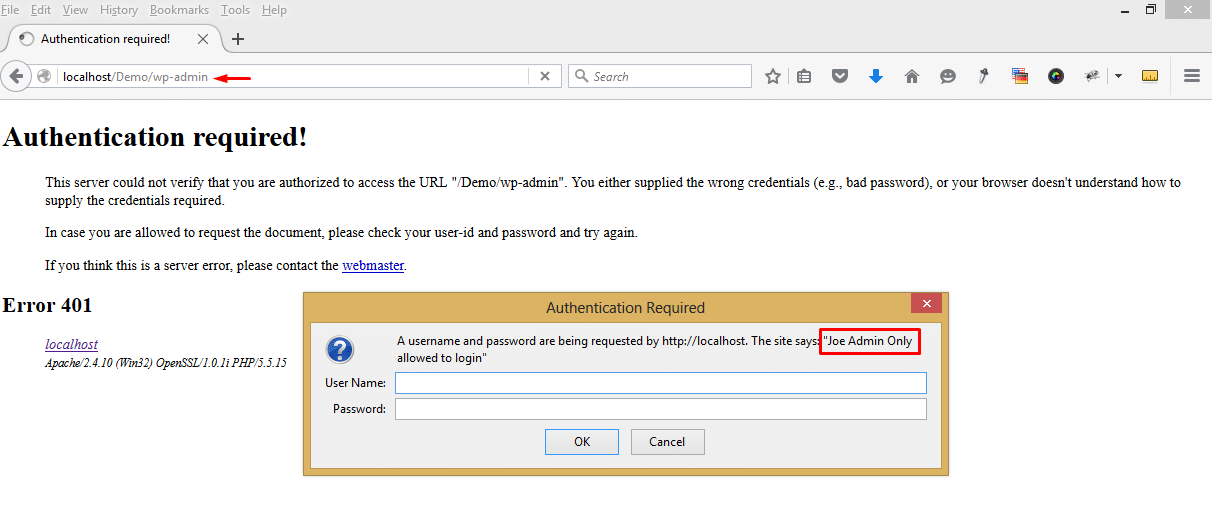
Remember to replace your username and respective server path. Then visit your WordPress admin page to test and see if it is effective. If you did everything correctly you should see the authentication login prompt ads follows:
6) Ban Spammers and Bots IP Address
You can use WordPress .htaccess to ban certain IPs from accessing your site. You just need to add the following code to your .htaccess: #Ban Spammers and bots by blacklisting IP addresses
<Limit GET POST>
order allow,deny
deny from xxx.xxx.xx.x
deny from xxx.xxx.xx.x
deny from xxx.xxx.xx.x
deny from xxx.xxx.xx.x
deny from xxx.xxx.xx.x
allow from all
</Limit>
Replace the xxx.xxx.xx.x with the IP address of the spammer you want to ban from your site.
7) Optimize your site with GZip Compression
One of the effective ways to save bandwidth and speed up your site is compression. To implement Gzip compression and optimize your site for high-speed load add the following code to .htaccess <IfModule mod_deflate.c>
AddOutputFilterByType DEFLATE text/html text/plain text/xml text/css application/x-javascript
BrowserMatch ^Mozilla/4 gzip-only-text/html
BrowserMatch ^Mozilla/4\.0[678] no-gzip
BrowserMatch \bMSIE !no-gzip !gzip-only-text/html
</IfModule>
8) Limit File uploads to 10MB
When you are dealing with a membership site, or site users upload content, you may find it useful to limit the size of the uploaded files. This can be done by adding the following code in your .htaccess: # Limit file uploads to 10MB
LimitRequestBody 10240000
9) Limit the Login by IP Address
You can use .htaccess to protect the WordPress admin area simply by limiting access to your IP and other selected IP addressed to do this use the following snippet : # Limit logins and admin by IP
# This goes in the /admin folder NOT root folder .htaccess
AuthUserFile /dev/null
AuthGroupFile /dev/null
AuthName "WordPress Admin Access Control”
AuthType Basic
<Limit GET POST PUT>
order deny,allow
deny from all
allow from xx.xx.xx.xx //( your static IP)
allow from xx.xx.xx.xx //( Whitelist IP)
allow from xx.xx.xx.xx //( Whitelist IP)
allow from xx.xx.xx.xx //( Whitelist IP)
allow from xx.xx.xx.xx //( Whitelist IP)
allow from xx.xx.xx.xx //( Whitelist IP)
</Limit>
10)Redirect Visitors to Maintenance Page
To redirect visitors automatically to maintenance page use the following snippet in your htaccess: RewriteEngine on
RewriteCond %{REQUEST_URI} !/maintenance.html$
RewriteCond %{REMOTE_ADDR} !^123\.123\.123\.123
RewriteRule $ /maintenance.html [R=302,L]
11) Redirect Permalinks
When you set the permalinks to /%postname%/ and want to redirect the other permalinks to that format you can use the following snippet in your .htaccess: RedirectMatch 301 /([0-9]+)/([0-9]+)/([0-9]+)/(.*)$ http://www.yoursite.com/$4
12) Creating 301 Redirects for old URLs
You can utilize 301 redirects to tell your users the page has been moved to a new location. To redirect users using the .htaccess from one old URL to another we should use the following snippet in the .htaccess: Redirect 301 /oldurl/ http://www.example.com/newurl
If you want to create custom 404 error redirects use the following snippet code: #Custom error pages
ErrorDocument 401 /err/401.php
ErrorDocument 403 /err/403.php
ErrorDocument 404 /err/404.php
ErrorDocument 500 /err/500.php
14) Protect Plugin files from Access
WordPress plugins can be exploited by hackers to access your site. To prevent access to your plugin files, use the following code in your .htaccess: <Files ~ "\.(js|css)$">
order allow,deny
allow from all
</Files>
15) Auto-Correct Spelling of URLs
You can auto-correct spelling mistakes in your URL using the following code in your .htaccess: <IfModule mod_speling.c>
CheckSpelling On
</IfModule>
WordPress .htaccess in Sub-directories Installations
The WordPress .htaccess in installation in subdirectories tends to change from the default file. There are instances where the installation uses the parent htaccess resulting in several 404 pages for the directory site. To solve this problem your subdirectory WordPress installation should always have the .htaccess as follows:
<IfModule mod_rewrite.c>

RewriteEngine On

RewriteBase /subdirectoryname/

RewriteRule ^index\.php$ - [L]

RewriteCond %{REQUEST_FILENAME} !-f

RewriteCond %{REQUEST_FILENAME} !-d

RewriteRule . /subdirectoryname/index.php [L]

</IfModule>
You should replace subdirectoryname with the name of your directory and place this htaccess file inside the folder where your WordPress installation is located.
For example, if the subdirectory of WordPress installation is named demo, the .htaccess should look like this: <IfModule mod_rewrite.c>
RewriteEngine On
RewriteBase /demo/
RewriteRule ^index\.php$ - [L]
RewriteCond %{REQUEST_FILENAME} !-f
RewriteCond %{REQUEST_FILENAME} !-d
RewriteRule . /demo/index.php [L]
</IfModule> WordPress .htaccess in Multisite
This applies for Multisite running on WordPress 3.5 or later, uses either of these htaccess files depending on how you have installed the multisite, it can either be a subdirectory or subdomain based multisite:
Subfolder Multisite RewriteEngine On
RewriteBase /
RewriteRule ^index\.php$ - [L]
# add a trailing slash to /wp-admin
RewriteRule ^([_0-9a-zA-Z-]+/)?wp-admin$ $1wp-admin/ [R=301,L]
Hacked Sites: Automatic Reset .htaccess File Permissions to 444
I have also previously experienced a common scenario where the permissions revert to default 444 after changing them as illustrated above. This shows that your site is possibly hacked and has some malicious code or backdoor pages that keep changing the .htaccess permissions back to the default 444. You should take the following steps to clean up the site and secure it:
You should immediately take the site offline and change permissions to 600 for the main site folder.
You should then rename the site folder and create a new folder with the name of that folder. For example, if hacked site folder: jengah.com rename it to old_njengah.com then create a new folder named njengah.com
Put your site in the maintenance mode by placing the file named .maintenance in the folder, you can add your own HTML code in the file to display a message that your site is offline for a few hours.
Download the latest version of WordPress and replace the old wp-includes and wp-admin folders with the freshly downloaded version. This is intended to clean the WordPress core of the malicious code or backdoor pages.
Replace all the other files apart from wp-config.php with the freshly downloaded WordPress files and rename everything back to its original name.
Install a WordPress security plugin like Sucuri or Wordfence and scan your installation for any other malicious code. When you are done your .htaccess should be back to normal.
Conclusion
I hope this comprehensive tutorial of WordPress .htaccess is absolutely helpful to you in understanding the role of .htaccess in WordPress and how to manipulate it. I would like to hear your thoughts, comments, compliments, or further questions regarding this topic. If you would like to get in touch, please do not hesitate to leave a comment.
We use cookies on our website to give you the most relevant experience by remembering your preferences and repeat visits. By clicking “Accept”, you consent to the use of ALL the cookies.
This website uses cookies to improve your experience while you navigate through the website. Out of these, the cookies that are categorized as necessary are stored on your browser as they are essential for the working of basic functionalities of the website. We also use third-party cookies that help us analyze and understand how you use this website. These cookies will be stored in your browser only with your consent. You also have the option to opt-out of these cookies. But opting out of some of these cookies may affect your browsing experience.
Necessary cookies are absolutely essential for the website to function properly. This category only includes cookies that ensures basic functionalities and security features of the website. These cookies do not store any personal information.
Any cookies that may not be particularly necessary for the website to function and is used specifically to collect user personal data via analytics, ads, other embedded contents are termed as non-necessary cookies. It is mandatory to procure user consent prior to running these cookies on your website.

No Comments Yet