
Changing your username in WordPress is not as easy as some think it might be at first.
You can't simply log into your admin area and change it. There's a bit of a process you need to go through.
There are two common ways that people use to go about changing their WordPress usernames.
The first involves creating a new user in your admin area. The second involves going into your database.
We’ll go over each way below. But first, you have to decide if changing your username is really what you want to do.
Changing the Name that Appears on Your Site
Before actually changing your username, first, you need to ask if you really want to change your username or if you just want a different name to appear on the public version of your site.
If you just want a different name to show up on the front end of your site, then there’s an easier solution to that than changing your username.
We’ll go over how to do that below.
In the admin area, go to Users > Your Profile
There you will see two boxes you need to pay attention to:
- Nickname
- Display name publicly as
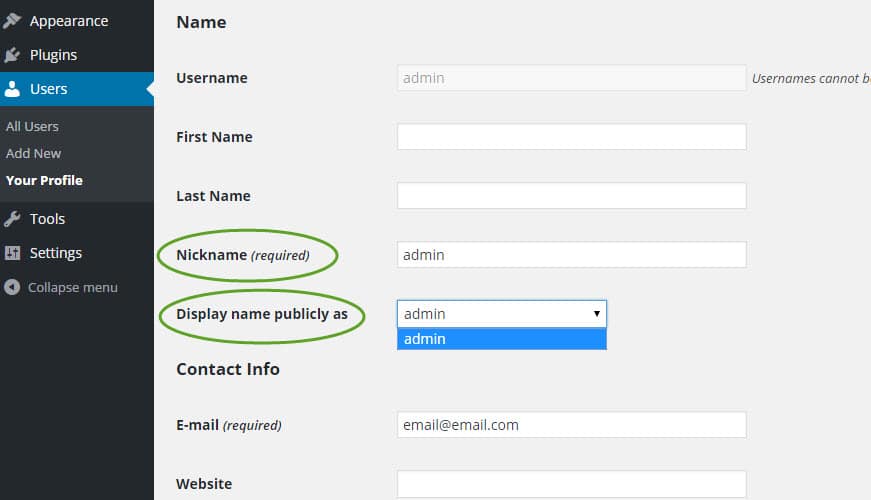
When you pull the menu down in the “Display name publicly as” section, you will see the different names you can choose from.
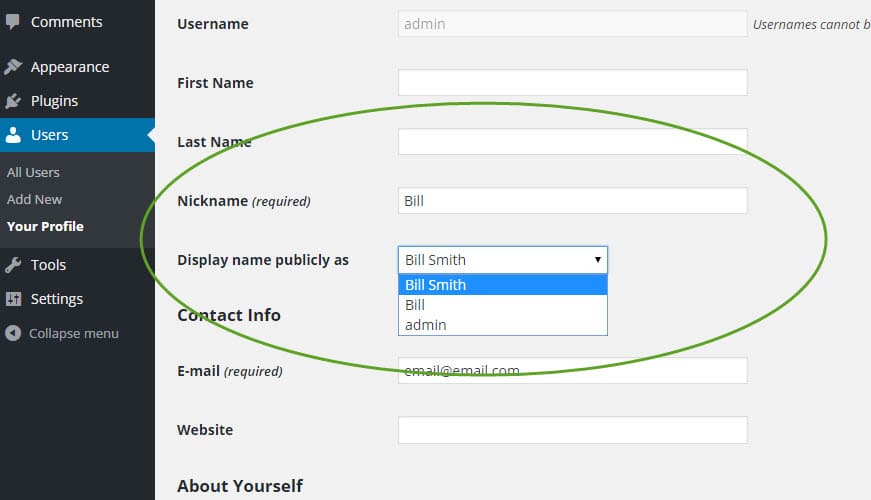
If you want to add a name to that area, then create a new nickname in the box above it, update the page at the bottom, and you will now see a new possible selection in the pulldown menu.
You’ll also notice in the example below that your current nickname and the name that is displayed publicly on your site don’t have to match up.
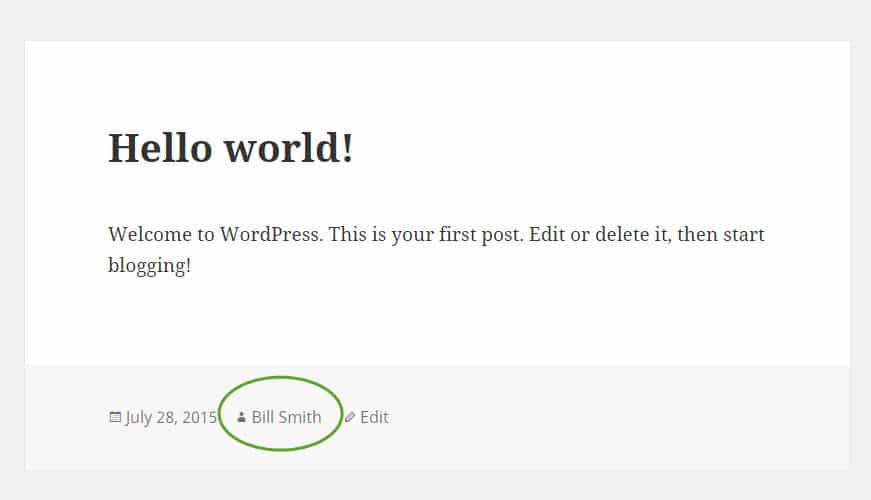
Here’s the name displayed on the front end.
METHOD 1: Changing Your WordPress Username by Re-Assigning Posts
OK, on to actually changing your username if that's what you need to do.
The first method we'll look into uses a 3-step process:
- Create a new user
- Assign posts to new user
- Delete or demote an old user
We’ll go over that in detail below.
Step 1: Create a New User
To create a new user, go to Users > Add New
Fill out the info there and make sure to give the user the appropriate permission level.
If you are replacing your “admin” user, for example, then you’ll need to make sure that the new user you create is also an administrator.
Step 2: Assign Posts to New User
Assuming you have posts you want to transfer over to the new user, it’s best to do that now.
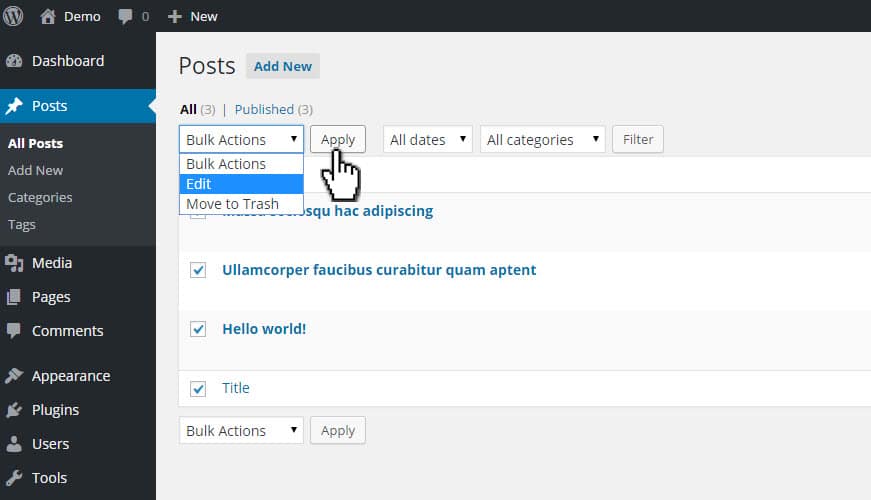
Go to Posts > All Posts
Check the box at the top of that page to select all the posts on the page.
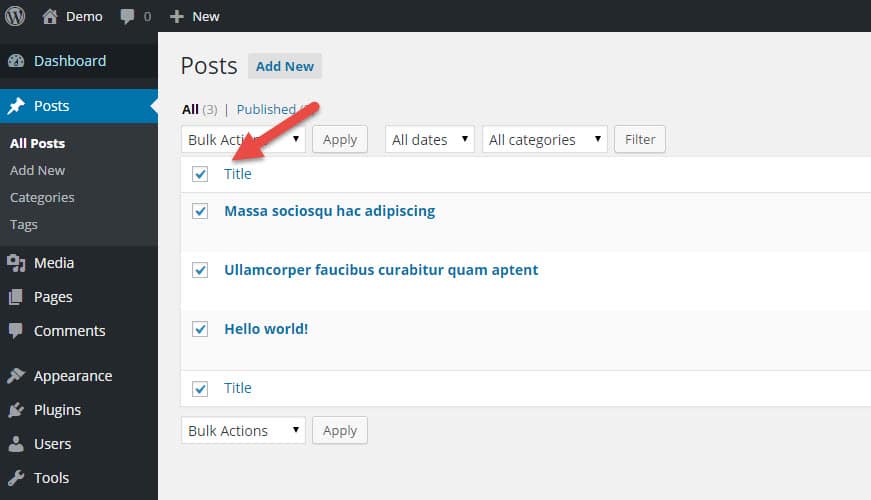
From the Bulk Actions pulldown menu at the top, choose Edit and then click Apply.
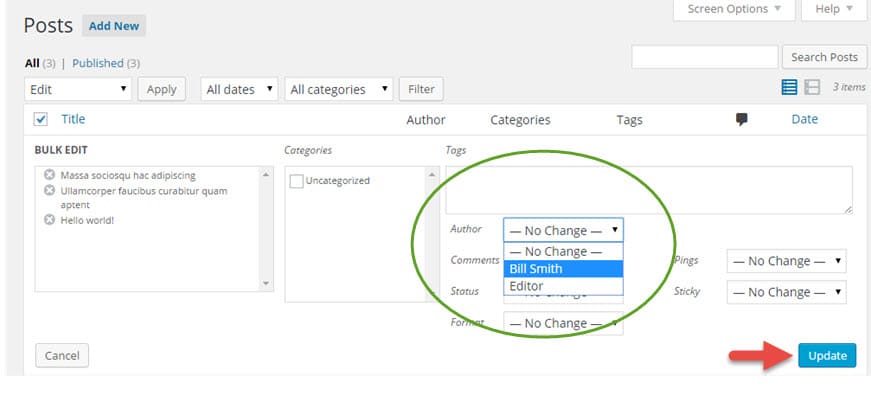
On the next screen, use the Author pulldown menu and choose the user you’d like to transfer the posts to, and then hit Update.
Step 3: Delete Your Old Username
Assuming you are changing your username in order to get rid of the old one, you can now log in as the new user, and then delete the old user from the site.
Go to Users > All Users, hover over the old user’s username, and then select Delete.
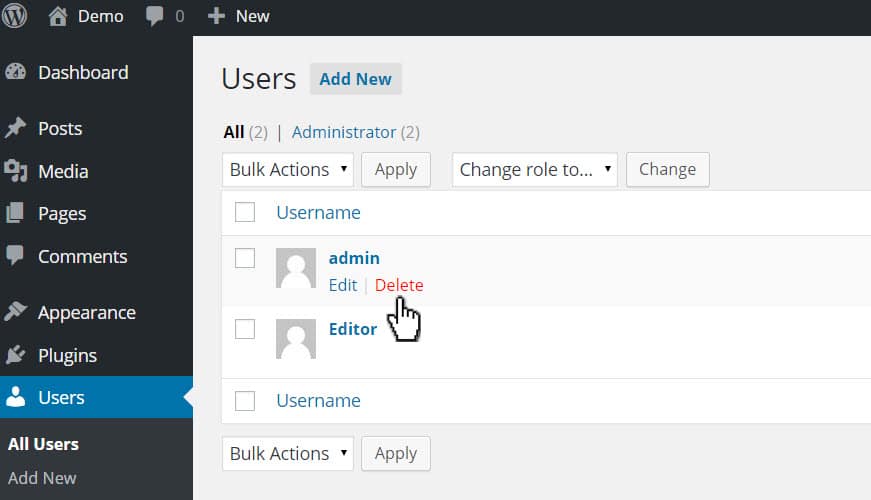
(Note: You can simply delete the old user once a new user has been created, and the system will ask you if you want to assign that user’s posts to a different user; however, this method of transferring the posts first seems safer to me.)
METHOD 2: Changing Your WordPress Username in the Database
The second method to change your WordPress username involves going into your database.
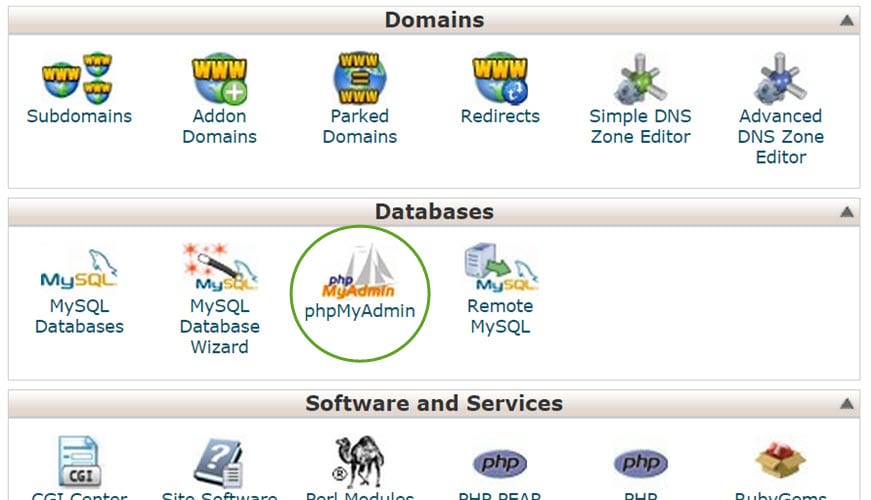
While different people have different ways of getting into their database, most use hosts that give you access to an interface called Cpanel. And so we’ll deal with that approach here.
Step 1: Access phpMyAdmin
Log into your Cpanel, and find the icon for phpMyAdmin. Click that and enter your database area.
(Note: If you have more than one database, you’ll need to select the correct one on the left of the next screen.)
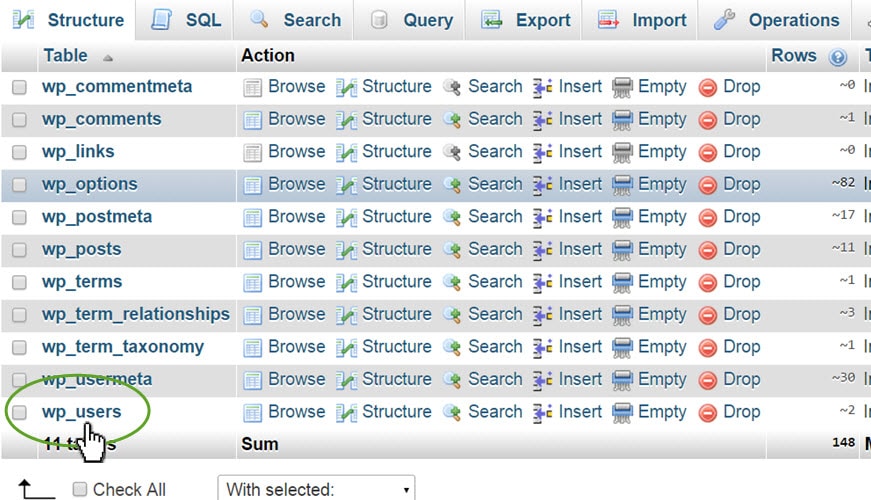
Step 2: Find the wp_users Table
Next, find the table called wp_users, and click that.
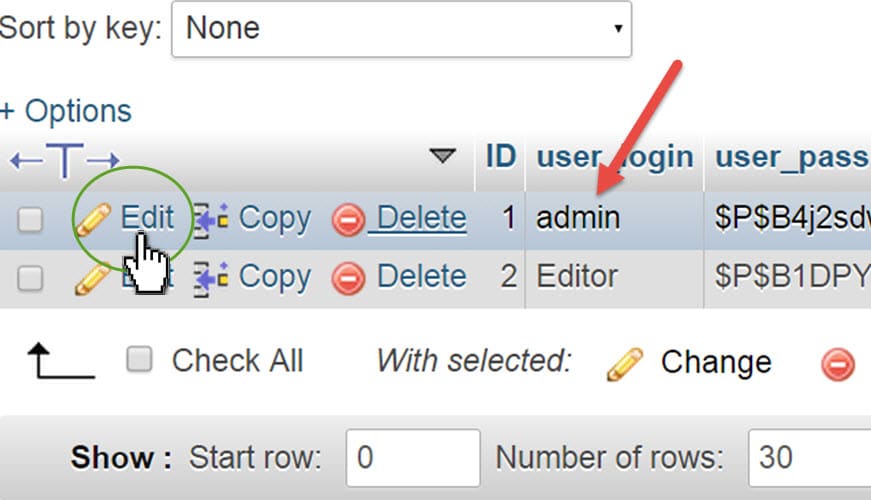
Step 3: Find User to Edit
Next, find the username you want to change, and click Edit.
Step 4: Edit User
There are 3 potential places you might want to change.
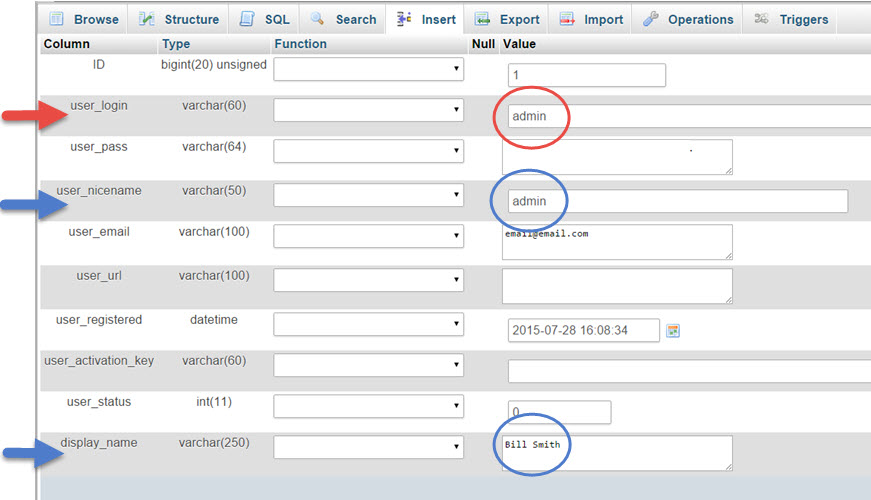
The only one that MUST be changed is the user_login section. That, of course, is the name you log in with.
The user_nicename appears in places like the URL of your posts. For example, if your user_nicename is “editor” and someone clicks on your name on one of your posts (even if it’s showing as “Bill Smith”), the URL they are taken to will be yoursite.com/author/editor/.
And finally, the display_name is the name displayed publicly on your site. You can also change that in the admin area of your site (as we talked about at the beginning of this post).
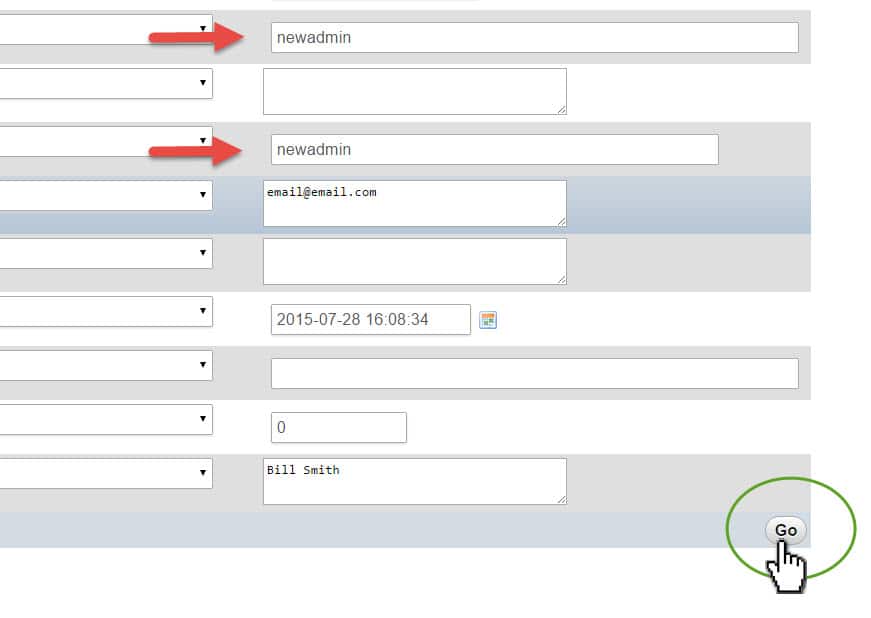
Change the ones you want to change and press the Go button at the bottom.
Which Method is Best?
The best method is the one you’re most comfortable with.
Remember to consider whether you’re really looking to change your username or whether you just want your name to appear differently on the public version of your site.
If you do want to change your username, then the database method is probably the quickest.
However, if you aren’t comfortable going into your database (and many people aren’t), then you can still achieve the change in your admin area alone.
No Comments Yet